It was a great weekend. Lots of disc golf, good food and perfect disc golf weather.
The journeys riding my 1999 Harley Davidson XLH 1200 Custom Sportster, 2008 Heritage Softail Classic & playing Disc Golf - Welcome!
Monday, September 24, 2012
DGCR Mid-Atlantic Meet
This weekend 30 DGCR members converged on Hawk Hollow for a weekend of disc golf. The weather couldn't have been any better. Clear blue skies and fair temps made the event.
It was a great weekend. Lots of disc golf, good food and perfect disc golf weather.
Thursday, September 20, 2012
New Improved Putter
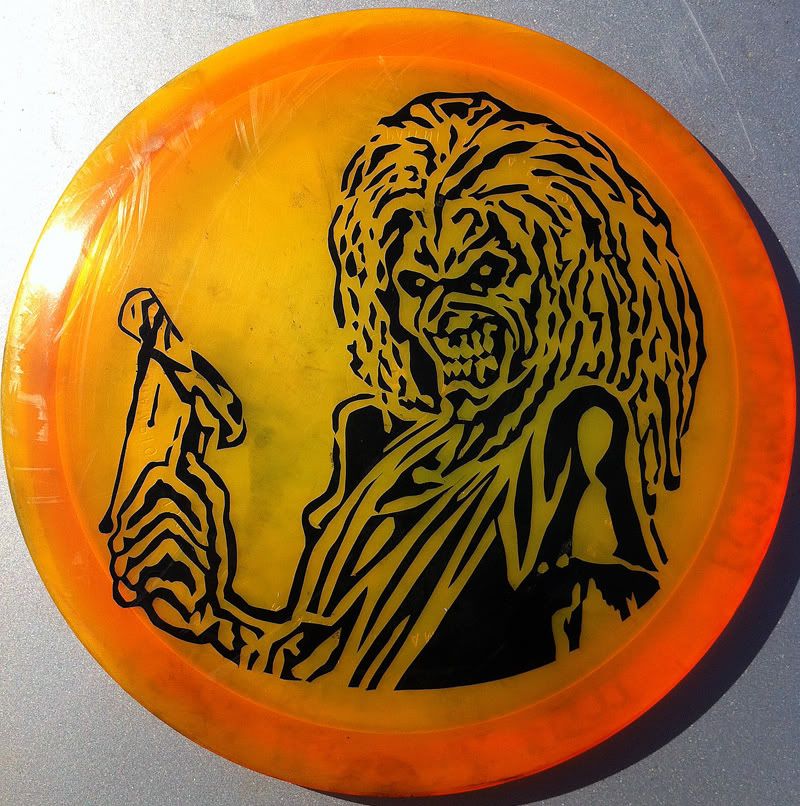
Altitude DG is going out of business and all of their plastic is 1/2 price. I was able to find an orange 165 Champion Dart and decided to try and improve my first putter dye.
This could be my best dye as far as cutting the mask clean and very minimum bleeds.
Saturday, September 15, 2012
Do a Little Dye, Play a Little Golf
I've been sick with a cold all week. It's been especially sucky considering this week the heat of Summer has been broken by the coming fall. I couldn't resist playing some morning rounds.
Today I woke up late and got started on finishing up my latest dye for a friend that is starting her disc golf journeys.
I ripped off the the girl from Greenday's "Kerplunk" album to pull this one off.
Afternoon was looking sweet for a round so I headed out to Loriella and as I walked up to the first tee Chris, his brother Dave, Randy and their friends were there so we played teams.
This was one of my best rounds ever. Parked birdie shots on #1, #2 & #7. Hit a 75' laser shot on #8 for birdie. Hit several 30'-40' putts and after 16 we were tied with Randy's team at 3 under.
Randy Parked the tee shot and I was about 30' out and hit the putt to keep up at -4.
Randy threw another good tee shot on 18 and was about 15' out. Dave's drive had us out about 25'. Dave missed but I was able to hit the putt to keep us at 5 under.
The tie breaker was a tee shot from 18's basket to #1's basket and again Randy teed up a great shot. My partner Dave went long & I wasn't too bad about 20' out but we both missed the putt and Randy was able to put it away.
But it was a great round for me. A lot of great drives, some great upshots & really good putting.
Sunday, September 09, 2012
Multi-Color 2nd Attempt
My new 134 Champion Blizzard Katana needed a samurai theme so I went to my favorite subject. Iron Maiden's mascot Eddie T. Head.
I figured with my Champion Cobra if I called you a loser but Mickey had a smile that would be OK.
Multi-Color Disc Dyes
It's been a while since I have posted anything. I did play in two tournaments. Did about the usual and didn't get in the prizes but I had fun.
The DGCR Hawk Hollow meet is coming up in 2 weeks and my contribution to the prize pool was to dye the trophy discs for Jerry. these were my first attempt at doing multiple colors.
They didn't turn out too bad for a first multi-color attempt.
Sunday, August 12, 2012
Beginners Guide for Disc Dyes (Long Post)
I have been dyeing discs for a month or two and I have gotten a lot of positive feedback on how well they look. I also get a lot of questions from others who want to try it for themselves.
I dyed a few more this weekend and took a lot of pics along the way. I'm going to try and explain this step by step.
To start off you will need some specific tools that will make this easier.
A light source and Xacto knife with #10 blades. I use a new blade for every mask I cut. (Sometimes I will use the same blade for multiple simple designs) The light source I have is left over from my pre-digital photography days. A Logan desktop light box I used to edit negatives on. You could probably find these pretty cheap since most photographers that went digital will have one of these sitting in a closet collecting dust. You will also need a black sharpie, a roll of simple masking tape and an old credit card.
There are lots of ways to get the light source. If you have a glass table top just place a lamp underneath.
For supplies I use Orcal 651 clear vinyl from U.S. Cutter (I use clear vinyl it's easier for me to see through) I also use iPoly Dyes (iDye for Polyester fabrics) I get from Dharma Trading. Don't use the enhancer with this dye. I don't use Rit dyes either because they changed the formula and you have to find certain lot numbers and that's a hassle.
Now that you have everything you need now you have to get your art ready. I do all my designs in Photoshop. But use what ever art program you are most comfortable with.
I made a base file with an 8" circle that I use because most discs are about 8.5 inches in diameter. I started with a full color album cover that I scanned and then worked it in to a black & white line art. Once you get it the way you want print it out and tape it to the back side of a square of the vinyl. Cut the vinyl a minimum of an inch larger than the printout on every side. (I like to have about 2" of extra vinyl extended from the edge of the art print out, you will see why later)
Once I'm done with the cutting and it's all covered with tape I use a sharpie to outline the art and then center a disc to draw a circle around it all to help me center the art when I stick it to the disc. I also use the old credit card and run it over the tape so when you pull the backing off the vinyl sticks to the tape for a later step.
I dyed a few more this weekend and took a lot of pics along the way. I'm going to try and explain this step by step.
To start off you will need some specific tools that will make this easier.
A light source and Xacto knife with #10 blades. I use a new blade for every mask I cut. (Sometimes I will use the same blade for multiple simple designs) The light source I have is left over from my pre-digital photography days. A Logan desktop light box I used to edit negatives on. You could probably find these pretty cheap since most photographers that went digital will have one of these sitting in a closet collecting dust. You will also need a black sharpie, a roll of simple masking tape and an old credit card.
There are lots of ways to get the light source. If you have a glass table top just place a lamp underneath.
For supplies I use Orcal 651 clear vinyl from U.S. Cutter (I use clear vinyl it's easier for me to see through) I also use iPoly Dyes (iDye for Polyester fabrics) I get from Dharma Trading. Don't use the enhancer with this dye. I don't use Rit dyes either because they changed the formula and you have to find certain lot numbers and that's a hassle.
Now that you have everything you need now you have to get your art ready. I do all my designs in Photoshop. But use what ever art program you are most comfortable with.
I made a base file with an 8" circle that I use because most discs are about 8.5 inches in diameter. I started with a full color album cover that I scanned and then worked it in to a black & white line art. Once you get it the way you want print it out and tape it to the back side of a square of the vinyl. Cut the vinyl a minimum of an inch larger than the printout on every side. (I like to have about 2" of extra vinyl extended from the edge of the art print out, you will see why later)
Now comes the fun part. Cutting the design out. Everywhere there is black is going to be cut out. This is where my bad vision finally pays off. I can get super close to what I'm cutting and make really detail cuts. But for your first dye start simple.
You need to use a soft touch. The vinyl cuts very easily and it real easy to cut all the way through. You will also try to keep cuts continuous without lifting the blade. This will prevent over cuts that could bleed when soaking in the dye. Weeding is removing the cuts that you want the dye to get through. I weed as I go so I don't miss anything. Some cut it all then weed out the cuts.
When cutting blocky text like the Impact Font I use a steel straight edge to get a nice clean cut.
I have found when cutting lines or detail cuts I try to cut from the inside out. This will make it easier to keep the cuts from popping up. An example would be cutting a small circle. If you cut the outside edge first you will need to hold down the vinyl while you cut the inside edge of the line. (Which is very difficult)
As I get areas cut out I cover it with masking tape. This will keep me from messing up the cuts while working on other areas.
The next step is getting the disc ready. I use left over paint reducer to remove the stock stamps. Generic Acetone you get at any hardware store will work fine. Do this step outside.
I like to use paper towels for this part. I use a circular motion and keep my other hand behind to counter the pressure. Don't stop until all the stamp has been removed. Pay close attention to the edges. Sometimes the stamp goes in to the plastic a little and is hard to get out.
Now comes the time that can make or break the entire project. Place the mask vinyl side down and peel the backing off from one corner while holding down the vinyl with the other hand.
I do this next step a little different than others. But it will help keep air bubbles out from between the vinyl and the disc. This is where the sharpie outline will come in handy. I have the mask on my light table sticky side up. I position the disc above the mask while I press down the center of the disc. I press the disc down on the mask just enough to get the center to stick and then lift up the disc. This is what you get...
I now use the old credit card and start in the center and work my way around the art work. Why I do it this way is it's easier to work out air bubble with the vinyl hanging down than to work out air bubbles with the mask laying on top. (I ruined a mask laying it down on the disc because it's hard controlling the vinyl from sticking where you don't want it too) This is the hardest part of the process because it's a make or break procedure. Mess up the mask and it's all wasted time. So take your time and practice a few times before pulling the backing off the vinyl.
I put the backing back on the sticky side of the vinyl for the next step of pulling off the tape.
Pull the tape off slowly watching for any small pieces of vinyl that didn't stick to the disc. If you get a renegade piece of vinyl use the Xacto blade to peel it off the tape and place it on the disc. When all the tape is off check the cuts closely to make sure there are no missing elements. Like the center of a letter or a small cut in a design that will leave a large black area.
Now I get the dye ready. I would recommend using an old large frying pan that you don't need anymore. I use an old beat up baking pan that works fine. I keep my unused and mixed dyes in Mason Jars.
Mix the dye one 1/2 oz. packet per quart of dye. Pour the dye in the quart jar and fill with hot water and mix it well. (Be careful! Mason jars don't seal well cold and if you shake it you could spill dye all over) Also try to keep you hands clean from dye you can get it all over furniture, floors and anything and it's a bitch cleaning it up. Wear old beat up clothes too.
I have a gas stove and set the flame as small as I can get it to stay lit. A good reference is to heat the dye the same temperature it would take to warm a baby bottle. Warm to the touch. You should be able to touch the side of the pan while it's on the heat. Don't get it too hot or the heat will loosen the adhesive on the vinyl and the dye will bleed where you don't want it.
While the dye is heating up now is the time to work out any air bubbles under the vinyl. The bubbles you worry about are the ones near the edges of a cut. Use the backside of the credit card to work them out. Be careful not to bind up the vinyl. Use the back of your thumbnail too. Work around the edges of the disc checking for vinyl that isn't quite stuck to the disc yet.
Once you have the mask ready and the dye is warmed up. The next step is to make a bowl with the extra vinyl. (this is where the larger square of vinyl comes in to play) Start at the corner and pinch the vinyl together to make a fold. This will also give you something to grab the disc with.
Set the disc in the warmed up dye. The time will depend on the plastic, temperature and strength of the dye. Star plastic will dye faster than Champion. Star takes just a few minutes Champion will take longer. You can grab the disc by the vinyl and lift it out just a few inches and look through the disc. (don't lift too high or dye will splash on the stove top) Be careful to keep dye from spilling over the vinyl to the back side of the disc.
You will see it getting darker and when you can't see through the dye on a Champion disc it's done.
Use a paper towel to hold under the disc to keep dye from dripping on everything and run it under cold water. Run water on the back side of the disc to get any dye that may have dripped over the vinyl.
Now comes the fun part. pulling off the vinyl. Some guys use warm soapy water, I just use my fingernail to peel it off a little at a time. You also will want to wash your hands a few times really well before you do this so you get any dye that can smear on the disc off your fingers and from under your nails.
The last step is to remove any adhesive from the vinyl after you pulled it all off. I use Goo Gone & a paper towel.
Now your done! Congratulations you have now dyed a disc. This type of art would be good for a first try. Simple designs with few intricate cuts are the best to learn with.
This is my replacement Champion Leopard I did to replace my first dye I lost last week. I'm very proud of this one. I spent about 20 hours cutting the mask and it came out really well.
I hope this helps anyone who is interested in dyeing a disc. Maybe use an old beat up disc for your first try so if you mess up it's not a big loss.
I've only been doing this a short time but I'm having a blast. The only thing limiting you is your imagination.
2 Rounds @ Loriella
Jerry and Sean came down from Maryland and we hit Loriella for two rounds today. The weather is cooling down and it wasn't too bad at all.
I didn't do too bad either. I must be getting in a little better shape I was able to play the second round and not burn out the gas tank.
Jerry even helped me figure out my mechanics problem and helped me improve my grip off the tee.
I didn't do too bad either. I must be getting in a little better shape I was able to play the second round and not burn out the gas tank.
Jerry even helped me figure out my mechanics problem and helped me improve my grip off the tee.
Saturday, August 04, 2012
Good & Bad day of DG
Austing & I traveled to Ruckersville to play Green County DGC.
The front 9 were fine. The holes were straightforward and not too tough.
Then came #10...
It's a straight downhill shot and the basket is across a little stream at the bottom. It doesn't seem tight woods but the thick briars on both sides you don't want to wander far from the fairway.
Austin steps up and throws a brand new neon green TeeBird and it goes hard left in to the thick stuff. We know this one's going to be tough to find.
Then I step up with my 150 Champion Leopard. My first disc dye with Eddie The Head on it. My favorite straight shot woods disc.
I throw a snappy straight shot down the middle right side.We both think are going to park by the basket. But it hits a tree and then drops straight down. It didn't kick left, it didn't kick right. It shot straight down. I never took my eyes off it. I watched the flight. I watched the tree hit. I watched it shoot straight down and bounce at the base of the tree.
At no time did I worry that I wouldn't find this disc.
Austin goes left to begin the search for his disc and I just want to find mine so I can take my backpack off and help look for his. I get to the tree I hit and no orange disc to be found.
We look for these discs for about an hour and nada.
Eventually we gave up and continued on our round. Losing this disc really sucked. It's not a long distance driver for me. I never throw it over water.
All I can do is hope that whom ever finds it calls the number on it.
The front 9 were fine. The holes were straightforward and not too tough.
Then came #10...
It's a straight downhill shot and the basket is across a little stream at the bottom. It doesn't seem tight woods but the thick briars on both sides you don't want to wander far from the fairway.
Austin steps up and throws a brand new neon green TeeBird and it goes hard left in to the thick stuff. We know this one's going to be tough to find.
Then I step up with my 150 Champion Leopard. My first disc dye with Eddie The Head on it. My favorite straight shot woods disc.
I throw a snappy straight shot down the middle right side.We both think are going to park by the basket. But it hits a tree and then drops straight down. It didn't kick left, it didn't kick right. It shot straight down. I never took my eyes off it. I watched the flight. I watched the tree hit. I watched it shoot straight down and bounce at the base of the tree.
At no time did I worry that I wouldn't find this disc.
Austin goes left to begin the search for his disc and I just want to find mine so I can take my backpack off and help look for his. I get to the tree I hit and no orange disc to be found.
We look for these discs for about an hour and nada.
Eventually we gave up and continued on our round. Losing this disc really sucked. It's not a long distance driver for me. I never throw it over water.
All I can do is hope that whom ever finds it calls the number on it.
Wednesday, July 25, 2012
PDGA World's, the rest of it...
It has been a long few days editing through thousands of image files. In a nutshell. for every keeper there are 10 you have to dump.
Out of all the groups I followed I had more fun photographing the junior divisions. They had so much fun just playing. They were competing but after the round they were goofing around and enjoying the moment.
My favorite pic of the tournament was taken early at Eager Beaver DGC. Braxton Lawrence missed a birdie putt and was frustrated about it. The amazing thing about it was just after this moment he saw me and started smiling. He walked over and wanted to see it and thought it was the funniest thing. Any other division if a player got mad or reacted badly I would just walk away because they were in a funk and didn't want a camera around.
Out of all the groups I followed I had more fun photographing the junior divisions. They had so much fun just playing. They were competing but after the round they were goofing around and enjoying the moment.
My favorite pic of the tournament was taken early at Eager Beaver DGC. Braxton Lawrence missed a birdie putt and was frustrated about it. The amazing thing about it was just after this moment he saw me and started smiling. He walked over and wanted to see it and thought it was the funniest thing. Any other division if a player got mad or reacted badly I would just walk away because they were in a funk and didn't want a camera around.
To see the rest of the images click the link...
Tuesday, July 17, 2012
First rounds at the Worlds
it's been a long and sometimes frustrating week. I got a lot of great pics of my friends and pissed off a few top pros.
Two off my friends were playing on Open Masters and Ken Climo showed up and they forgot he was playing Masters and not Open Pro and didn't have a card. So they put him on the first card with my friend.
On hole 7 Climo complains on the tee pad that I'm too close and in his line of sight. My friend tells him if he motions at me I'll move out of the way. But he doesn't so I don't move from my spot and The Champ sends one down the right side in to the woods. Then a course marshall tells me that Kenny said not to take his picture and stay out of his line of sight.
It bums me a little because I wasn't there to shoot Kenny but to get some good pics of my friend. Kenny was just a bonus.but I walk away and shoot other groups.
Chris on 18 at Nevin.
Two off my friends were playing on Open Masters and Ken Climo showed up and they forgot he was playing Masters and not Open Pro and didn't have a card. So they put him on the first card with my friend.
On hole 7 Climo complains on the tee pad that I'm too close and in his line of sight. My friend tells him if he motions at me I'll move out of the way. But he doesn't so I don't move from my spot and The Champ sends one down the right side in to the woods. Then a course marshall tells me that Kenny said not to take his picture and stay out of his line of sight.
It bums me a little because I wasn't there to shoot Kenny but to get some good pics of my friend. Kenny was just a bonus.but I walk away and shoot other groups.
Sunday, July 15, 2012
Day Two at the World's
This morning I stopped by the Blake Hotel to pick up my credentials.
I then played Nevin Park with Bob, Chris & Kristin while scouting shooting locations. My first day of shooting will be at Nevin with Pro Masters in the morning and Advanced Women in the afternoon.
After a lunch break I played Eastway Park and then headed back to the house for dinner.
Saturday, July 14, 2012
First Day in Charlottesville
Jeff, Bob & I made it too Charlottesville for the 2012 PDGA World's. The first day of shooting will be Tuesday. Today we arrived at the house we rented this afternoon and after unpacking the truck I headed to Eager Beaver at Elon Park and had a great round with some Jr division players from Oklahoma.
Thursday, July 12, 2012
Latest Dye...
I had one disc left in my back pack that didn't have any ink on it so I began searching for an idea. Then I remembered a great graphic by Steve "Espo" Powers. It's everything I like about graphics. It's simple, clean and has a great message.
I was able to get clean straight lies by using a steel strait edge on the text. It turned out really well and only bled a little near the edge where the blizzard plastic has texture.
Wednesday, July 11, 2012
All Ready for the World's
Saturday morning we head south to Charlotte, N.C. for the 2012 PDGA Disc Golf World Championships. Bob, Jeff, Chris & Austin are playing.
My original plan was to go with them and have fun and shoot some pics of my friends playing the event. Then the call went out for photographers so I'm going free lance the event for Disc Golfer Magazine. I'm still going to get shots of the Spotsy DGC players but I'll also be covering other divisions.
So if you see me out there don't be shy and come up and introduce yourself.....
Sunday, July 08, 2012
Too Hot to Play...
I head out to Loriella by 8 am and by hole 5 the sweat is pouring off me like I'm in a rain storm. The heat was just too much so I headed home.
It gave me the idea to take a pic of my putter and do a little Photoshop magic on it. Maybe this evening it will cool off enough to play.
Subscribe to:
Posts (Atom)